
Aged Care and Disability v1.80 is now available
21 July 2024
Announcement of Release Cycle Change
We are excited to announce an important change to our product release cycle, aimed at improving our delivery process and to better align with your needs.
New Release Cycle Structure:
Effective after this July release—the last of our current monthly releases—we will transition to a quarterly release cycle. The new structure is as follows:
- Quarterly Major Releases: At the end of each quarter, we will roll out a major release. This will include significant updates, new features, and comprehensive improvements. Release notes and video demos (where applicable) will be available as part of this process.
- Monthly Minor Releases: While our primary focus will be on the quarterly major releases, we will continue to support monthly minor releases. These will be available on a per-request basis and will address urgent specific customer requests or critical issue fixes.
Scope of Change:
This change will affect all our Australian Healthcare Salesforce managed packages, including Aged Care and Disability, Healthcare Lumary, and Award Interpretation packages such as Easy Employer, 2Cloud9, and Employment Hero (formerly KeyPay).
Why the Change?
- Quality and Stability: By focusing on quarterly major releases, we can dedicate more time to testing and refining each update, ensuring higher quality and greater stability for our products.
- Innovative Features: This new cycle allows us to develop and introduce more innovative features and enhancements that add significant value to your business operations.
- Increased Time for Upgrade and Testing: We understand that some customers have struggled to keep up with monthly releases due to availability of dedicated testing resources and change management implications. Transitioning to a quarterly release schedule will provide additional time to effectively upgrade and manage updates.
If you have any questions, please reach out to our Customer Success team.
Verify Email Addresses to Meet the Email Verification Requirement
To complete enforcement of the email verification requirement introduced in the Spring ’22 major release, Salesforce now requires all users in all orgs and Experience Cloud sites to verify their email address. If a user sends an email from an unverified email address, Salesforce rejects this email message and doesn’t complete the send. Unverified email addresses can’t be used for sends until the user verifies their email address or resets their password. To avoid disruptions, ensure that all user email addresses are verified.
Read more from Salesforce Summer ’24 Release Notes.
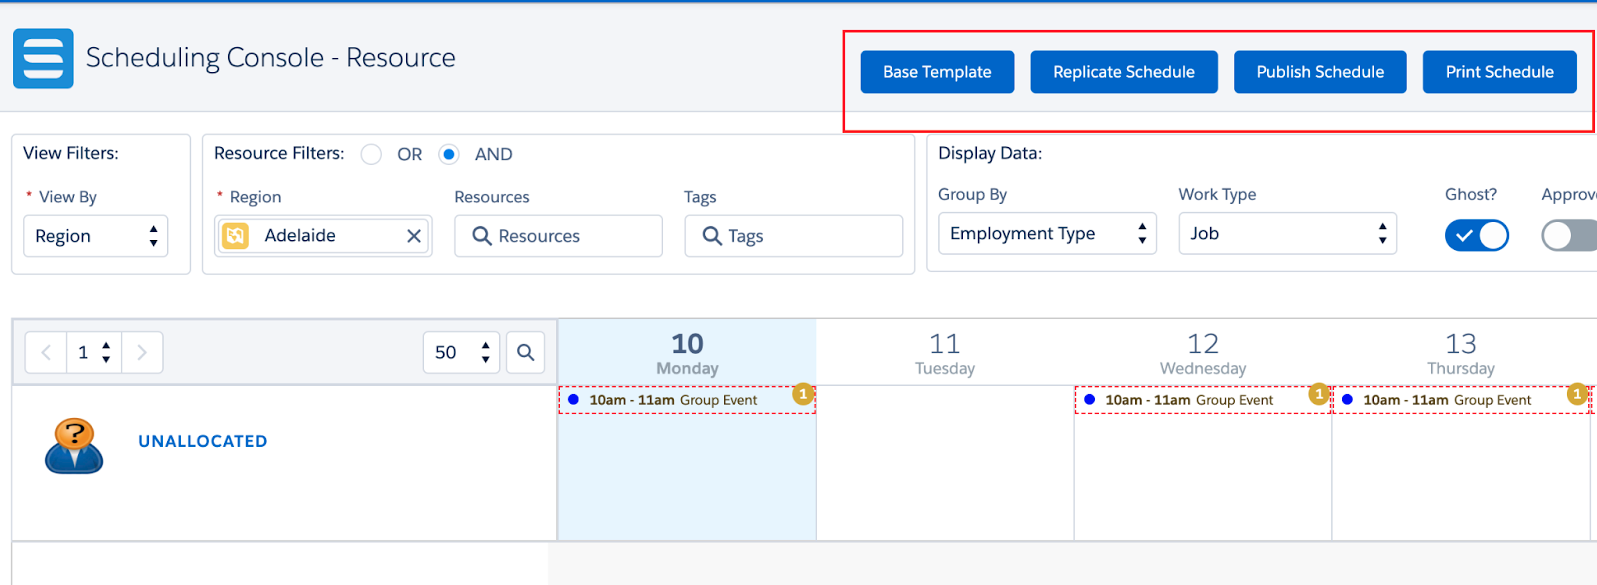
What’s New
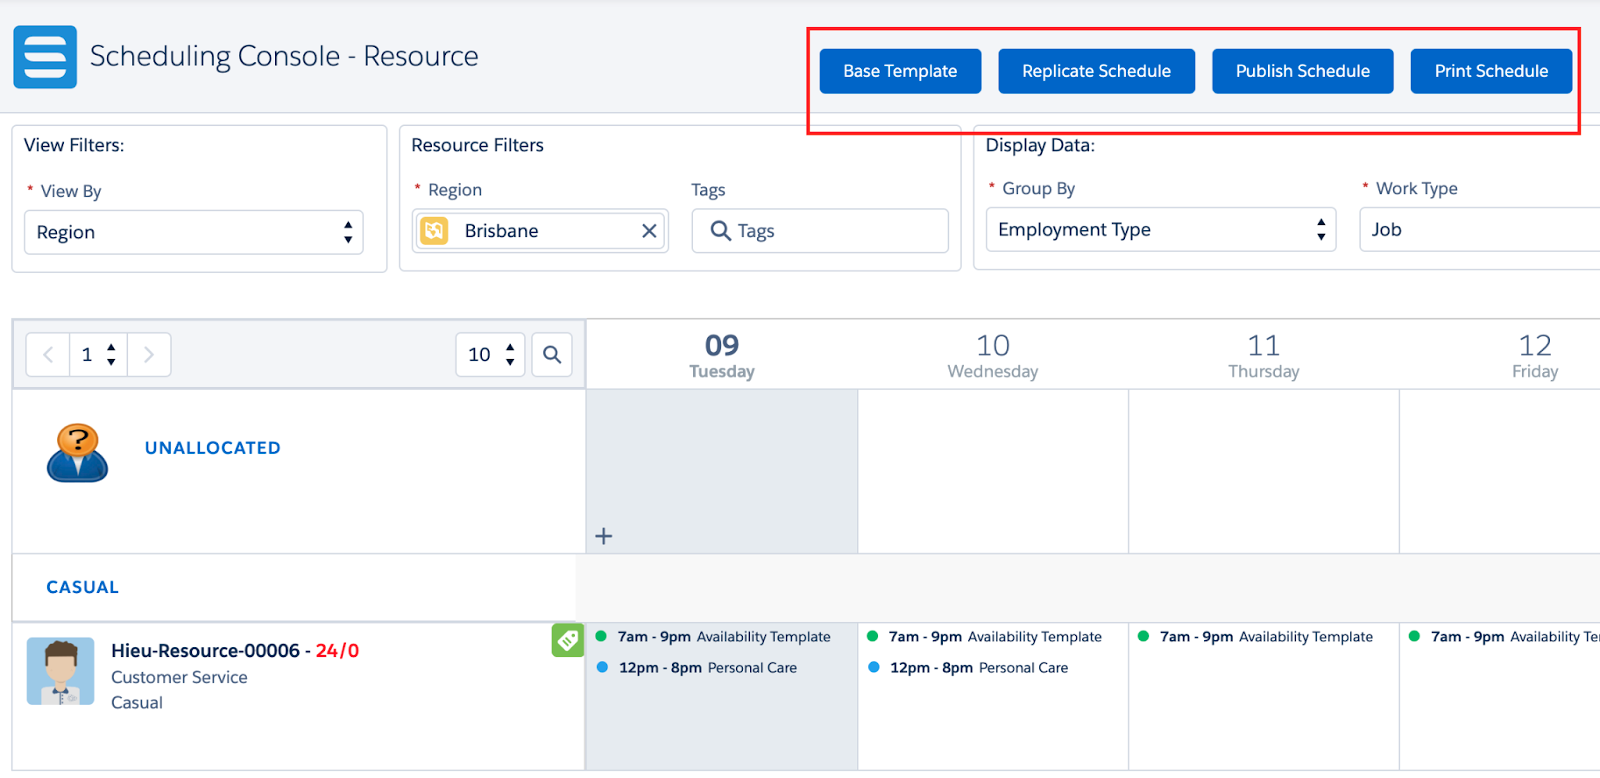
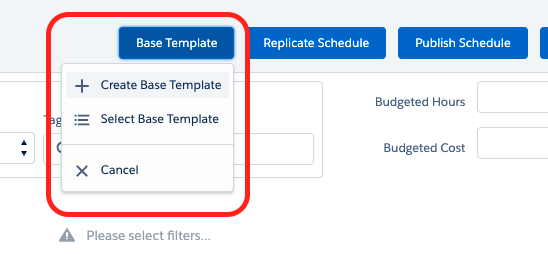
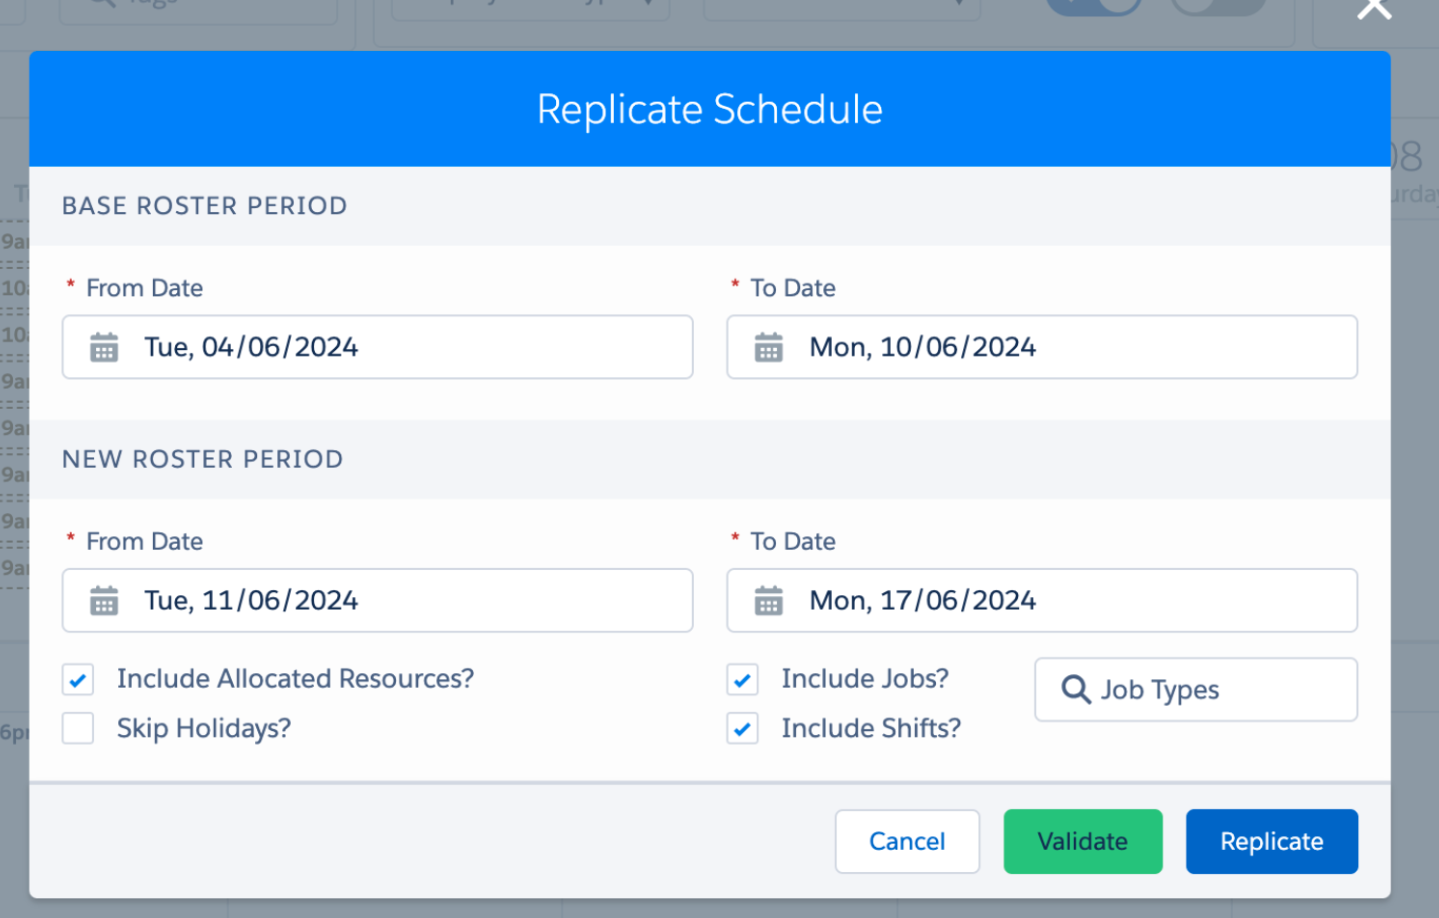
Region Base Template and Roster Replication
Regional base template
When viewing work in the Scheduling Console and filtering it by Region, schedulers now have the ability to create base templates for regions enabling replication of future rosters.
[Image 1]
Jobs that are in Pending Dispatched status, and Shifts that are not published (Is Draft = true), associated with the Region will be linked to the newly created template. Activities by design are not tied to regions, hence will not be linked to the region base templates.
Validations:
- A region base template cannot be created at overlapping times with existing ones that are for the same region or an associated location that has the same region. This is to retain the 1:1 relationship of any specific jobs or shifts to a base template, reducing the risk of replicating the same jobs or shifts.
[Image 2]
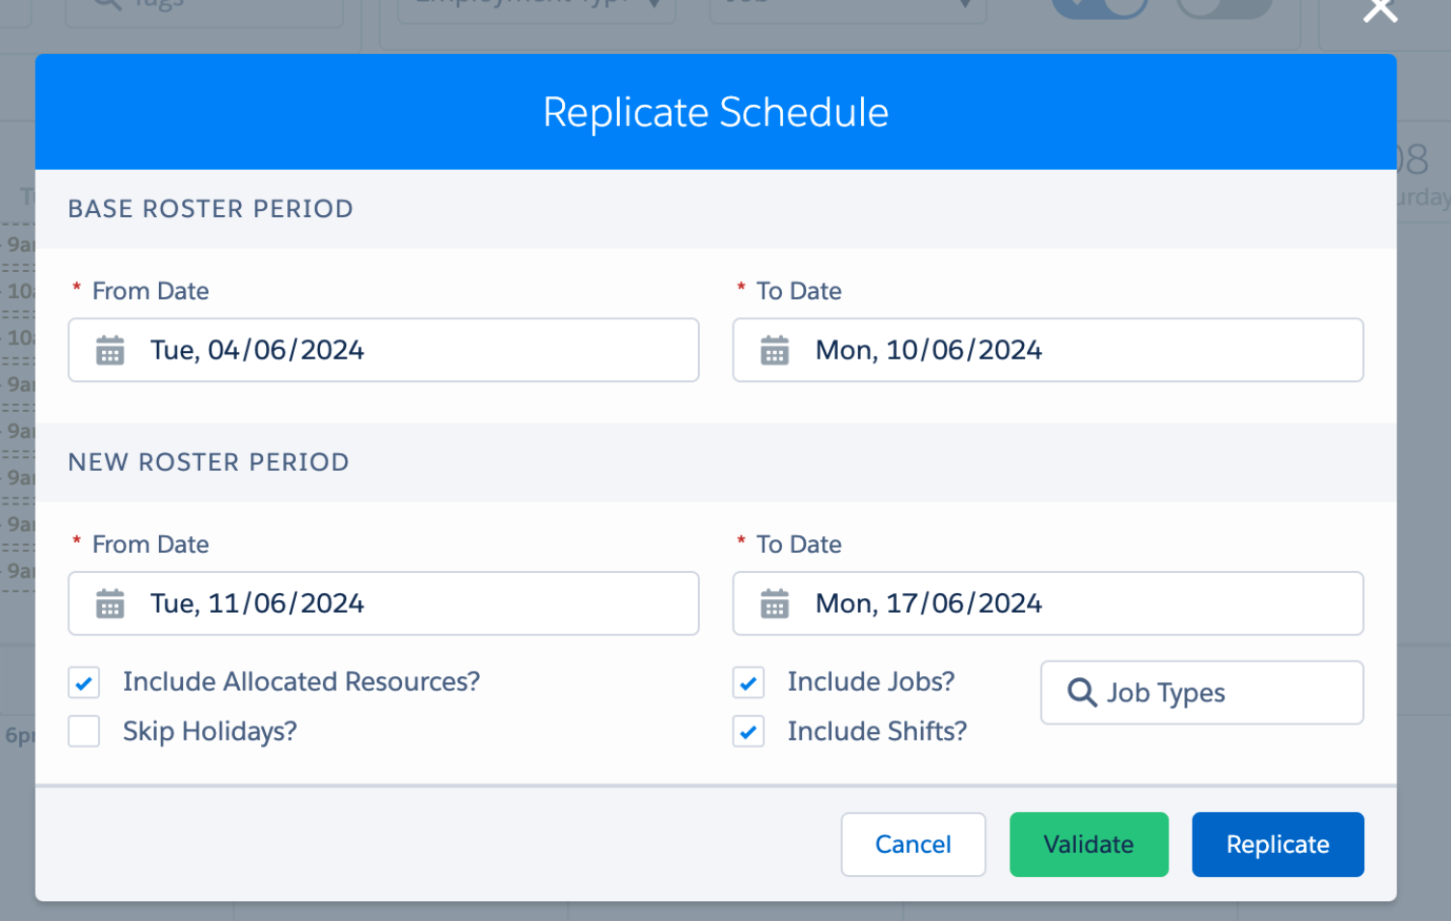
- A base template cannot be created when it has the same name as the existing one.
[Image 3]
How to create a Region Base Template ? – Watch Video
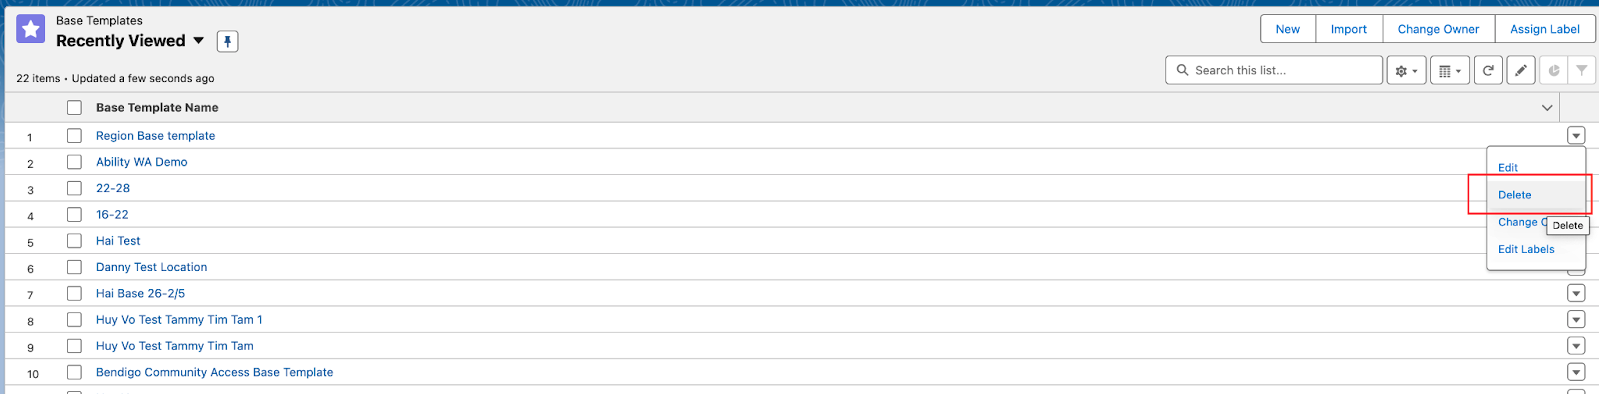
Base templates can be deleted in case they were mistakenly created following below steps:
- Go to Base Templates
- Find the Delete option on the record
- Delete the record. This will automatically detach all the linked events from the base template.
- The events (Jobs and Shifts) will still exist but will no longer be part of the Base Template. The jobs will need to be deleted individually if they are no longer required. [Image 4]
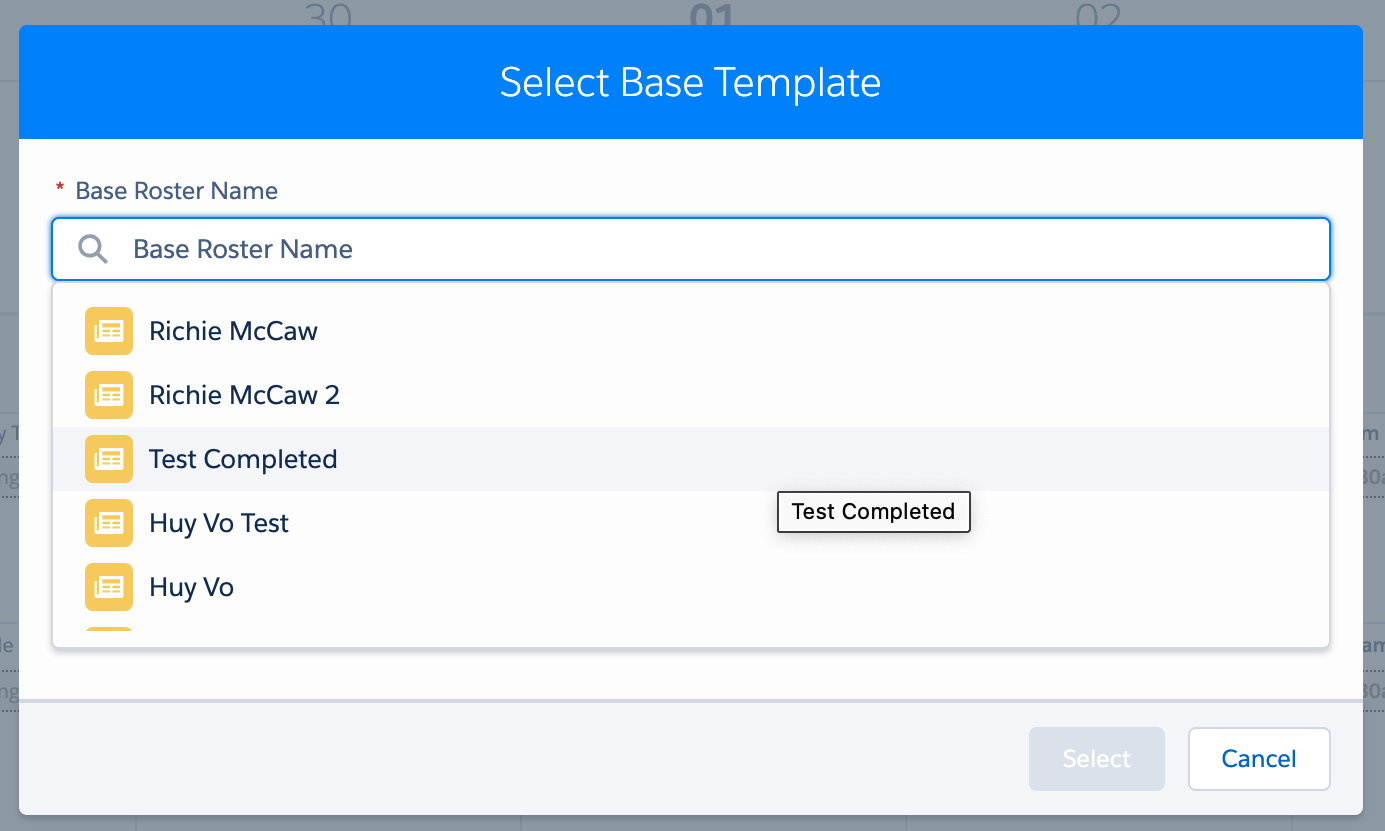
To access an existing regional base template, find and select the template from the picklist.
While inside a base template, creating any new events such as jobs or shifts with the matching region will automatically attach the events to the base template.
A region base template can be validated or replicated with the experience similar to the location base template. Jobs, Shifts that are linked to the base template within the template period are the records that will be validated/replicated. Activities again by design are not tied to regions, hence will not be linked to the region base templates and not an option for these processes.
[Image 7]
How to replicate a Region Base Template ? – Watch Video
Replicating and validating a region roster
Instead of replicating the events from a region base template, schedulers can directly replicate those events that are on the current viewing roster.
The experience is very similar to replicating or validating events of a region base template. Select Replicate Schedule option as below.
Publishing a region roster
After the Jobs and Shifts are replicated into the new roster period, schedulers can now publish those events to the resources.
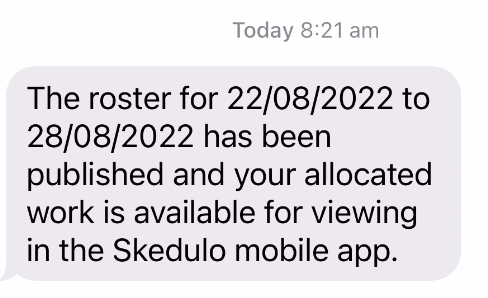
Publishing a roster results in:
- The work between and including the new roster period dates will be published to the allocated resources, specifically:
- The Jobs with Pending Dispatch status will be updated to Dispatched.
- The Shifts that are marked as “Is Draft” will have this indicator removed.
- A single notification will be sent to each resource with at least one allocated work item within and including the new roster period dates. [Image 12]
- An email notification with details of the publication will be sent to Salesforce users registered with the nominated public work group. [Image 13]
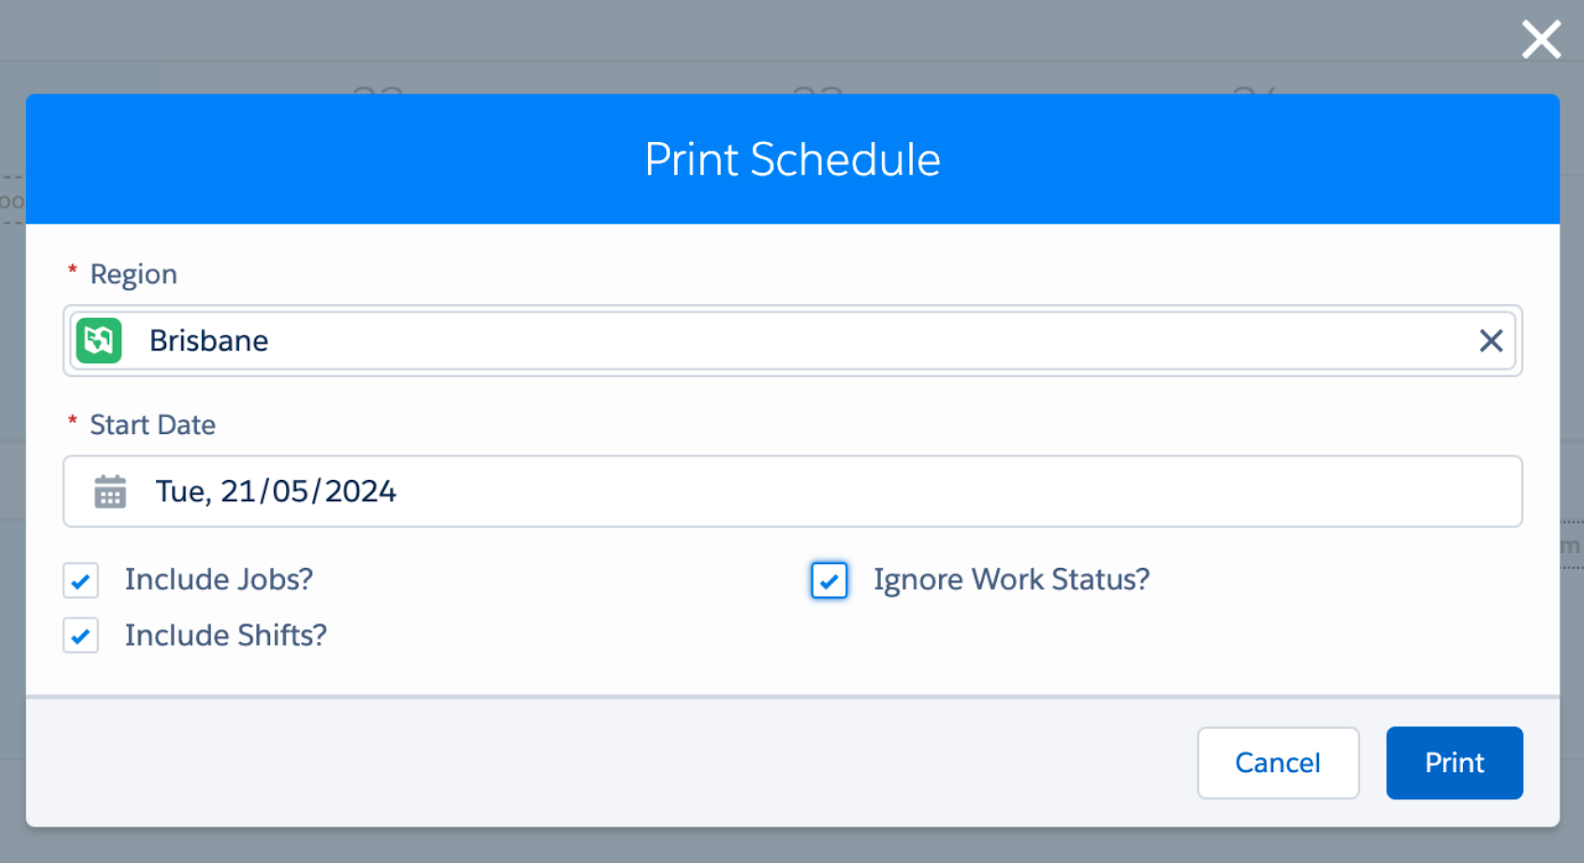
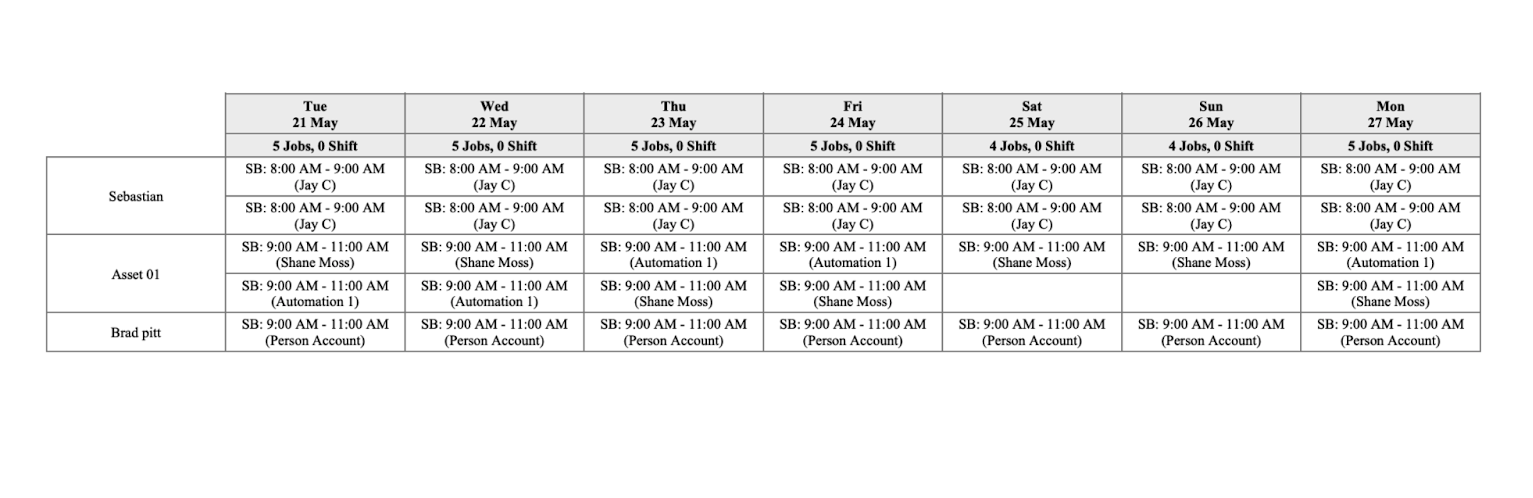
Printing a region roster
Schedulers can print a region weekly roster.
[Image 14]
Jobs and Shifts that are associated with the region will be printed.
[Image 15]
Feature flag
This set of region base templates and roster replication features is controlled under a setting:
- Go to Setup
- Find and open Custom Metadata Types
- Manage records of HC_Console_Settings
- Find and edit setting Region_BaseTemplate_and_Replication
- Update value to True (show the buttons), False (hide the buttons). False is the default value.
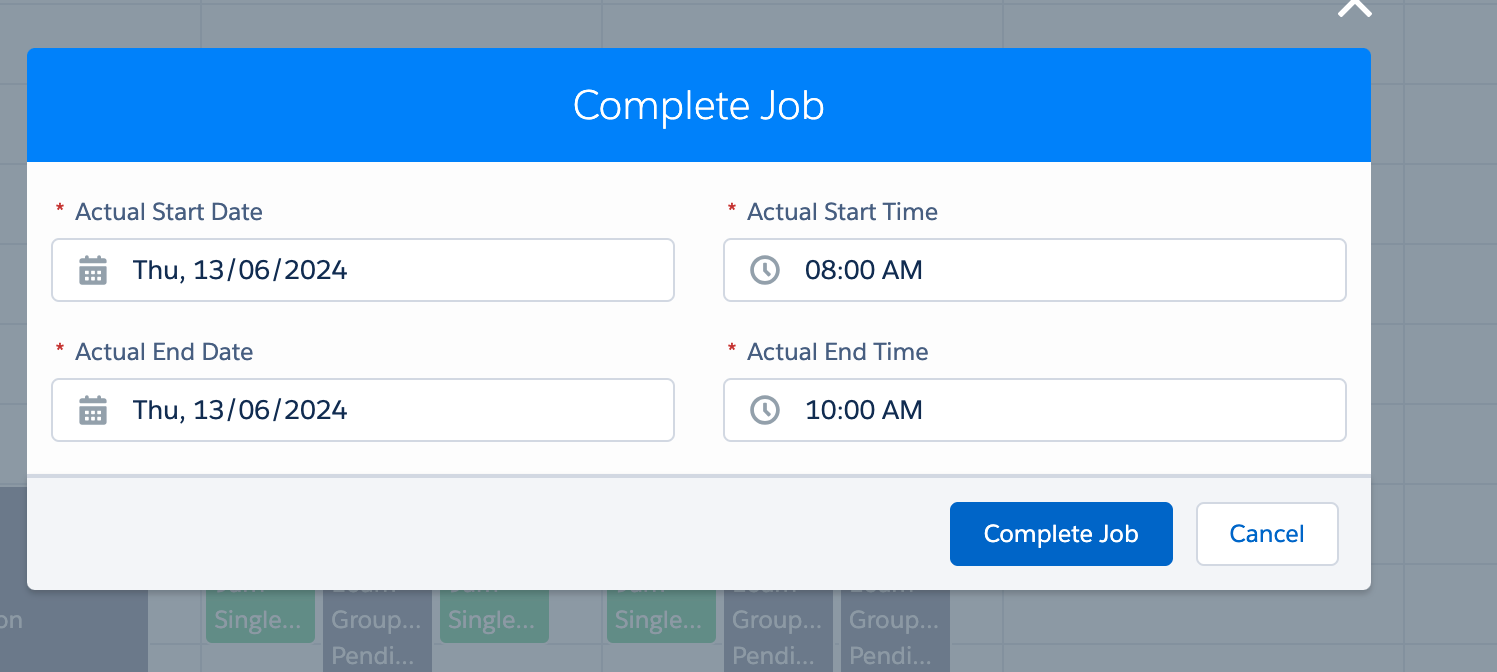
Resource Calendar – Populating Scheduled Dates and Times when Completing Jobs
When completing a job from the Resource Calendar, the actual date and time fields are now pre-populated with scheduled dates and times.
Schedulers can still make changes to the values before confirming complete.
[Image 16]
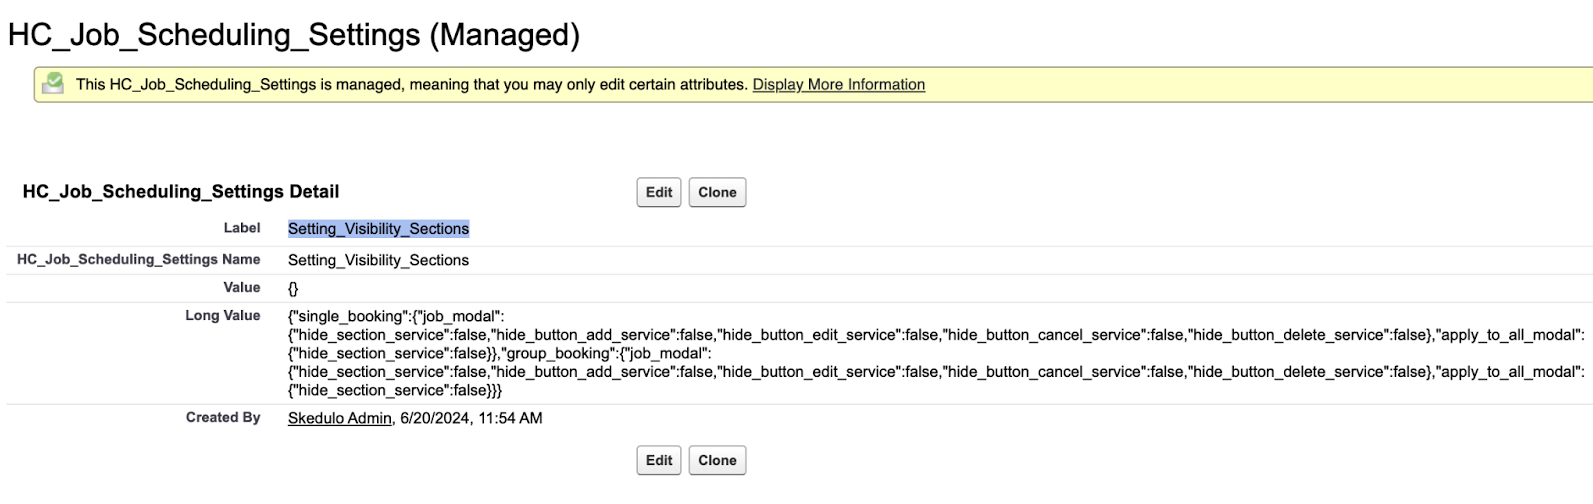
Job Creation and Edit – Flexibility in hiding Buttons and Sections
Introducing a new setting group to flexibly hide buttons and/or sections on job creation and job edit modals:
- Go to Setup
- Find and open Custom Metadata Types
- Manage records of HC_Job_Scheduling_Settings
- Find and edit setting group Setting_Visibility_Sections
- Update value in each individual setting as below:
- hide_section_service: True (hide the Service section), False (show the Service section). Default is False.
- hide_button_add_service: True (hide the Add Service button), False (show the Add Service button). Default is False.
- hide_button_edit_service: True (hide the Edit Service button), False (show the Edit Service button). Default is False.
- hide_button_cancel_service: True (hide the Cancel Service button), False (show the Cancel Service button). Default is False.
- hide_button_delete_service: True (hide the Delete Service button), False (show the Delete Service button). Default is False.
- “apply_to_all_modal”:{“hide_section_service”: True (hide the Service section on Apply to All modal), False (show the Service section on Apply to All modal). Default is False.
The settings can be managed separately for Single Booking or Group Event jobs.
What if the business does not need to hide any buttons or sections?
All settings above can be set to False to keep the current state as is. All default values are also set to False.
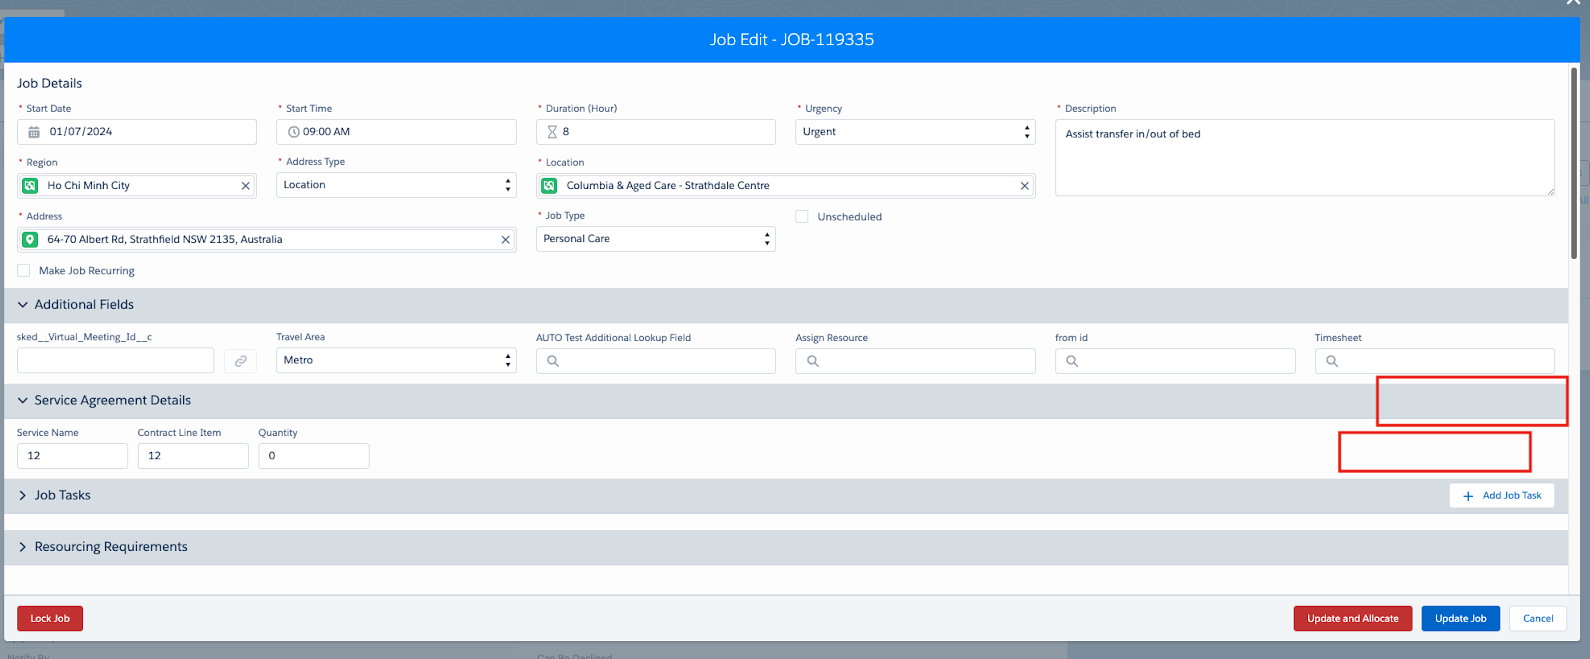
Auto Submission and Auto Approval of Resource Timesheets
Auto submission
A daily batch can be set up to auto submit timesheets for resources.
When the batch is run on the timesheet period’s end date:
- For the resources who have timesheets created for that period and status is in “Draft”, it will update the status to “Pending Approval”.
- For the resources who yet have timesheets created for that period, it will create timesheets and set the status to “Pending Approval”.
When the batch is run on any days other than the timesheet period’s end date, it will not submit or create any timesheets.
How to set up?
Two new settings have been added:
- Go to Setup
- Find and open Custom Metadata Types
- Manage records of HC_Console_Settings
- Find below settings:
- Auto_Submit_Timesheet_Cron_Expression: edit the value of this setting to define the daily time the batch will run.
- Auto_Submit_Timesheet_Process: edit the value of this setting to globally activate or deactivate the batch run. True (to activate), False (to deactivate).
After the above settings are configured, a script needs to be executed to initiate the batch:
skedGlobalHandler.runAutoTimesheet();
Please contact your Tech Support for assistance on setting this up.
Updating the batch time
In case the batch time is updated, the script needs to be run again:
- Update Auto_Submit_Timesheet_Cron_Expression to match the new batch time.
- Remove the current batch job that is already in place from the last execution of the script.
[Image 19]
- Run the script again.
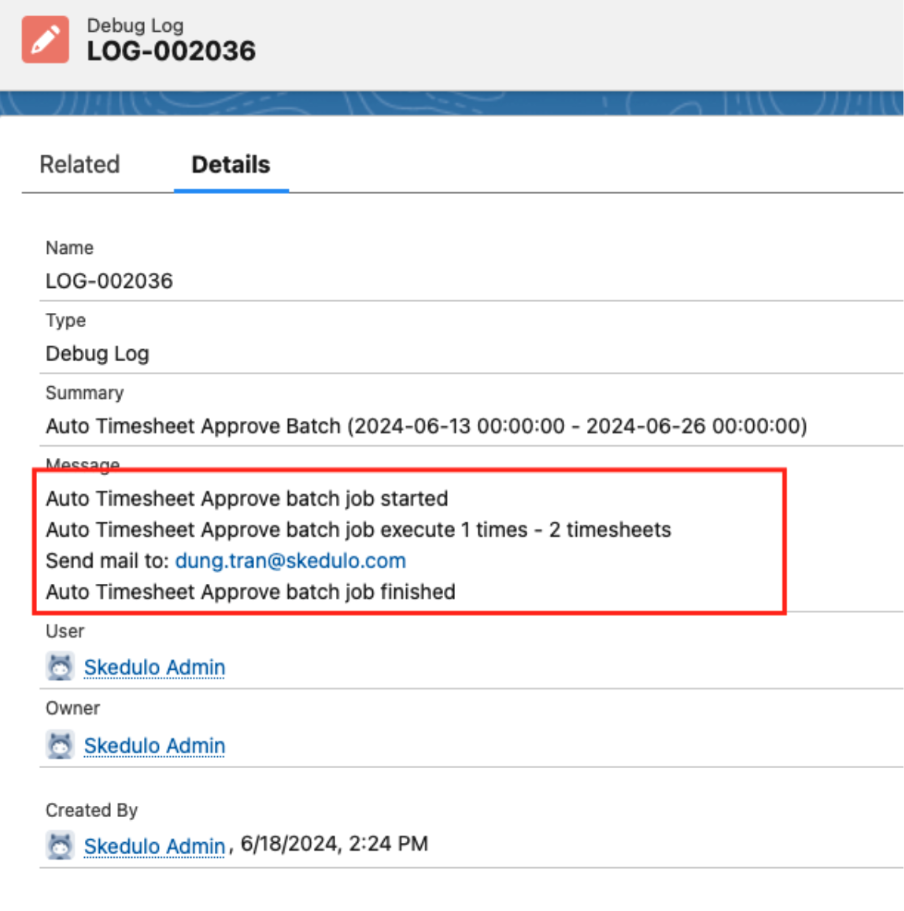
Debug log
To trace the results or issues during the batch process:
- Search and open Debug Log from App Launcher
- The related log for auto submission batch is as follows:
[Image 20]
Auto approval
A daily batch can be set up to auto approve timesheets for resources on behalf of their managers or schedulers.
When the batch is run on the timesheet period’s end date:
- It will collect and approve all timesheet records with status “Pending Approval”
- Timesheet records in status “Pending Approval” but have exceptions on Job Allocation and/or Resource Shift will not be auto approved:
- Exceptions are existing checkbox formula fields on Job Allocation and Resource Shift objects.
When the batch is run on any days other than the timesheet period’s end date, it will not approve any timesheets.
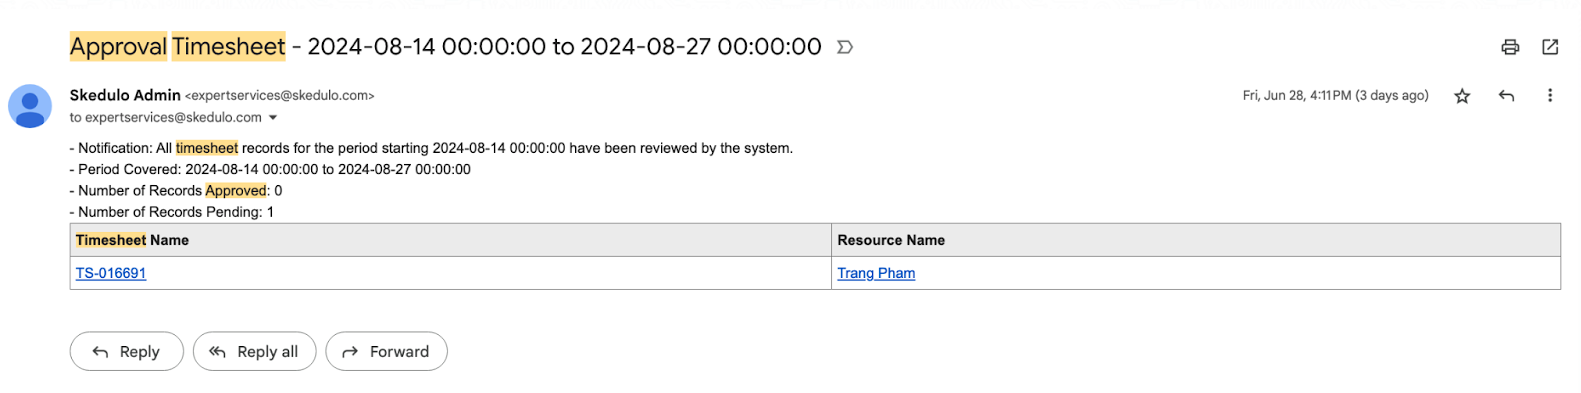
Email notification
Upon completion of the auto approval batch, an email will be sent out to the email addresses (emails are configurable, please see the “How to set up” section below) summarising the outcomes of the batch run. Any timesheet records that were not approved (have exceptions) will be listed with hyperlink for managers and schedulers to access and rectify.
[Image 21]
How to set up?
Three new settings have been added:
- Go to Setup
- Find and open Custom Metadata Types
- Manage records of HC_Console_Settings
- Find below settings:
- Auto_Approve_Timesheet_Cron_Expression: edit the value of this setting to define the daily time the batch will run (this should work best if the time is after the auto submission process).
- Auto_Approve_Timesheet_Process: edit the value of this setting to globally activate or deactivate the batch run. True (to activate), False (to deactivate).
- Auto_Approve_Exception_Email: edit the value of this setting to define the email addresses to receive email notifications. E.g: “expertservices@skedulo.com“.
After the above settings are configured, a script needs to be executed to initiate the batch:
skedGlobalHandler.runAutoTimesheet();
Please contact your Tech Support for assistance on setting this up.
Updating the batch time
In case the batch time is updated, the script needs to be run again:
- Update Auto_Approve_Timesheet_Cron_Expression to match the new batch time.
- Remove the current batch job that is already in place from the last execution of the script.
[Image 22]
- Run the script again.
Debug log
To trace the results or issues during the batch process:
- Search and open Debug Log from App Launcher
- The related log for auto approval batch is as follows:
[Image 23]
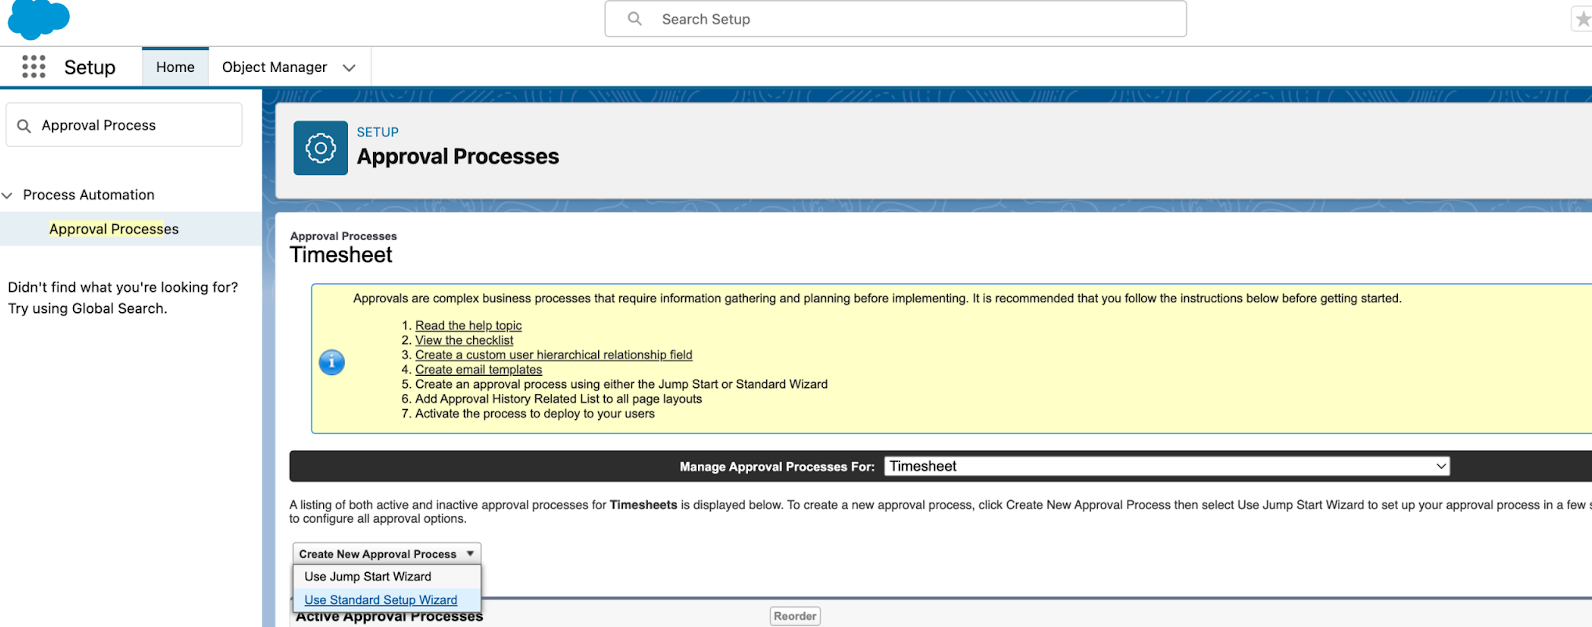
Notes – Dependency on Timesheet Approval Process
If your environments have had any approval processes (related to Timesheet) set up (see image), they might be intersecting with this new auto submission and auto approval feature.
If any issues occur, use the settings Auto_Submit_Timesheet_Process and Auto_Approve_Timesheet_Process to switch off the batch jobs.
[Image 24]
Issues Fixed
- The issue has been fixed whereby when editing the services on group event jobs, the schedulers were either experiencing a frozen screen or the field values that contained character “&” not populating.
Manual Installation Links
Sandbox: https://test.salesforce.com/packaging/installPackage.apexp?p0=04t4x000000vWmTAAU
Production: https://login.salesforce.com/packaging/installPackage.apexp?p0=04t4x000000vWmTAAU
Please note: You must be a Salesforce Administrator to install this package.